Showing posts with label Azure. Show all posts

March 25, 2026

Using Azure Notification Hub REST from Bruno

Task

Having migrated away from rather bloated Postman to using Bruno, I needed to make REST API calls to Azure Notification Hub. It requires specific Authentication heared and you need to build it in a Pre Request Script.

Solution

Here's the script. Use Header: Authorization with value {{azure-authorization}}. Enjoy!

const CryptoJS = require('crypto-js');

function getAuthHeader(targetUri, ruleId, sharedKey,

expiresInMins) {

targetUri = encodeURIComponent(targetUri.toLowerCase()).toLowerCase();

// Set expiration in seconds

var expireOnDate = new Date();

expireOnDate.setMinutes(expireOnDate.getMinutes() + expiresInMins);

var expires = Date.UTC(expireOnDate.getUTCFullYear(), expireOnDate

.getUTCMonth(), expireOnDate.getUTCDate(), expireOnDate

.getUTCHours(), expireOnDate.getUTCMinutes(), expireOnDate

.getUTCSeconds()) / 1000;

var tosign = targetUri + '\n' + expires;

// using CryptoJS

var signature = CryptoJS.HmacSHA256(tosign, sharedKey);

var base64signature = signature.toString(CryptoJS.enc.Base64);

var base64UriEncoded = encodeURIComponent(base64signature);

// construct autorization string

var token = "SharedAccessSignature sr=" + targetUri + "&sig="

+ base64UriEncoded + "&se=" + expires + "&skn=" + ruleId;

//console.log("signature:" + token);

return token;

}

const baseUrl = bru.getFolderVar('url');

const currentTemplateUrl = req.getUrl();

// Replace the template with the real value

const resolvedUrl = currentTemplateUrl.replace("{{url}}", baseUrl);


bru.setVar('azure-authorization', getAuthHeader(resolvedUrl, "<<SharedAccessKeyName>>", "<<SharedAccessKey>>", 1));

bru.setVar('current-date',new Date().toUTCString());

April 28, 2021

Azure B2C: Adding missing translations on Page Layouts

Problem

After starting to use Azure B2C custom Page Layout versions newer than 2.0.0, you will find translations are missing on many controls. Documentation is lacking behind, so it will take some trial and error to figure out some of the translation IDs. In the following pictures, you see missing translations marked with beautiful hand drawn red arrows.


Solution

As B2C _should_ already include these translations, the only workaround currently is to manually provide the missing strings in your Custom Policy. The following will work for urn:com:microsoft:aad:b2c:elements:contract:unifiedssp:2.1.4 and urn:com:microsoft:aad:b2c:elements:contract:selfasserted:2.1.4.

So first of all, add LocalizedResourceReference elements in the ContentDefinition elements.

 1
 2
 3
 4
 5
 6
 7
 8
 9
10
11
12
13
14
15
16
17
18
19
20
21
22
<ContentDefinition Id="api.signuporsignin">
  <LoadUri>https://xyz.blob.core.windows.net/customui/ocean_blue/unified.html</LoadUri>
  <RecoveryUri>https://xyz.blob.core.windows.net/customui/ocean_blue/exception.html</RecoveryUri>
  <DataUri>urn:com:microsoft:aad:b2c:elements:contract:unifiedssp:2.1.4</DataUri>
  <Metadata>
    <Item Key="DisplayName">Signin and Signup</Item>
  </Metadata>
  <LocalizedResourcesReferences MergeBehavior="Prepend">
    <LocalizedResourcesReference Language="fi" LocalizedResourcesReferenceId="api.signuporsignin.fi" />
  </LocalizedResourcesReferences>
</ContentDefinition>
<ContentDefinition Id="api.selfasserted">
  <LoadUri>https://xyz.blob.core.windows.net/customui/ocean_blue/selfAsserted.html</LoadUri>
  <RecoveryUri>https://xyz.blob.core.windows.net/customui/ocean_blue/exception.html</RecoveryUri>
  <DataUri>urn:com:microsoft:aad:b2c:elements:contract:selfasserted:2.1.4</DataUri>
  <Metadata>
    <Item Key="DisplayName">Collect information from user page</Item>
  </Metadata>
  <LocalizedResourcesReferences MergeBehavior="Prepend">
    <LocalizedResourcesReference Language="fi" LocalizedResourcesReferenceId="api.localaccountpasswordreset.fi" />
  </LocalizedResourcesReferences>
</ContentDefinition>

Then the actual strings you will add in the Localization element.

 1
 2
 3
 4
 5
 6
 7
 8
 9
10
11
12
13
14
15
16
17
18
19
20
21
22
<LocalizedResources Id="api.signuporsignin.fi">
  <LocalizedStrings>
    <LocalizedString ElementType="ClaimType" ElementId="signInName" StringId="DisplayName">Sähköpostiosoite</LocalizedString>
    <LocalizedString ElementType="ClaimType" ElementId="password" StringId="DisplayName">Salasana</LocalizedString>
    <LocalizedString ElementType="UxElement" StringId="local_intro_generic">Kirjaudu sisään aiemmin luodulla tililläsi</LocalizedString>
  </LocalizedStrings>
</LocalizedResources>
<LocalizedResources Id="api.localaccountpasswordreset.fi">
  <LocalizedStrings>
    <LocalizedString ElementType="ClaimType" ElementId="email" StringId="DisplayName">Sähköpostiosoite</LocalizedString>
    <LocalizedString ElementType="ClaimType" ElementId="VerificationCode" StringId="DisplayName">Vahvistuskoodi</LocalizedString>
    <LocalizedString ElementType="ClaimType" ElementId="signInNames.emailAddress" StringId="DisplayName">Sähköpostiosoite</LocalizedString>
    <LocalizedString ElementType="DisplayControl" ElementId="emailVerificationSSPRControl" StringId="email">Sähköpostiosoite</LocalizedString>
    <LocalizedString ElementType="DisplayControl" ElementId="emailVerificationSSPRControl" StringId="ver_input">Vahvistuskoodi</LocalizedString>
    <LocalizedString ElementType="DisplayControl" ElementId="emailVerificationSSPRControl" StringId="verificationcode">Vahvistuskoodi</LocalizedString>
    <LocalizedString ElementType="DisplayControl" ElementId="emailVerificationSSPRControl" StringId="intro_msg">Syötä sähköpostiosoitteesi ja paina Lähetä vahvistuskoodi -painiketta.</LocalizedString>
    <LocalizedString ElementType="DisplayControl" ElementId="emailVerificationSSPRControl" StringId="but_send_code">Lähetä vahvistuskoodi</LocalizedString>
    <LocalizedString ElementType="DisplayControl" ElementId="emailVerificationSSPRControl" StringId="but_verify_code">Vahvista koodi</LocalizedString>
    <LocalizedString ElementType="DisplayControl" ElementId="emailVerificationSSPRControl" StringId="but_send_new_code">Lähetä uusi koodi</LocalizedString>
    <LocalizedString ElementType="DisplayControl" ElementId="emailVerificationSSPRControl" StringId="success_send_code_msg">Vahvistuskoodi on lähetetty sähköpostiisi. Kopioi se alla olevaan syöteruutuun ja paina Vahvista koodi -painiketta.</LocalizedString>
  </LocalizedStrings>
</LocalizedResources>

Please note that this is not a comprehensive list of missing translations, so feel free to comment below if you happen to have a full tested list of translations that will work with the new Page Layouts.

January 27, 2021

Azure Managed Identity: Obtaining token gives error ‘invalid_client’

Problem

One of our Azure App Services suddenly started behaving badly and throwing HTTP 400 errors. From Application Insights we could see the error was coming from a call to LOCALHOST:PORT/MSI/token which is the location where access token is requested in case your code wants to access other Azure resources using Managed Identity (formerly MSI).

Troubleshooting

I went to Kudu PowerShell console of the given App Service and tried to manually get the access_token, but couldn’t.

Command for that is:
Invoke-WebRequest -Uri 'http://127.0.0.1:41332/MSI/token/?resource=https://management.azure.com/&api-version=2017-09-01' -Method GET -Headers @{Metadata="true";Secret="$env:MSI_SECRET"} -UseBasicParsing

Note! Port in the URL is different in your App Service, you can get it via @env:MSI_ENDPOINT.

All I got was HTTP 401 error with ‘invalid_client’ error code. Strange. In respective DEV App Service there was no errors and access_code was returned nicely.

By the way, details of the Uri and other parameters can be found here. Header is different if you’re using more recent api-version.

By the way, if you just run the Invoke-WebRequest, you will get error:

Win32 internal error "The handle is invalid" 0x6 occurred while reading the console output buffer. Contact Microsoft Customer Support Services.

No point in contacting MS Support, just run the following command and retry:

$ProgressPreference="SilentlyContinue"

Solution

Now, for the solution…good old IISRESET. Of course in Azure you restart the App Service in question. After restarting the App Service, you can re-run the Invoke-WebRequest, and access_token is returned correctly, and App Service works.

May 14, 2020

Microsoft Flow: Using HTTP Webhook action with Azure Automation Runbook

Task

I needed to create new SharePoint Online Document Library and amongst other things set a Retention Label on that newly created Document Library using Microsoft Flow. Creating new doclib is straightforward using Flow, but I just couldn’t set the the Retention Label via REST from Flow. There is an API for that, but due to reasons I couldn’t get it to work from Flow.

We had an Azure Automation Runbook that was called at the end of the Flow anyway, so I decided to use that to set the Label on the SPO Library using SharePoint Online PnP’s Set-PnPLabel. No problem. However, it takes a while for the Label to be applied to the Library and as email was sent to users at the end of the Flow, they found themselves in the library too early, i.e., the Label was not yet set.

Solution

FLOW

I could’ve used  a “Do Until” loop in Flow and poll the list but that’s not something we like to do, right? We like events and triggers, so why not use the HTTP Webhook action, sounds exciting!


In the screenshot above, I’m calling the Azure Automation Runbook, but you can really call anything that is capable of listening to your request and at the and making a HTTP request back to the callback URL you define. You define your endpoint address in the Subscribe - URI field.

In the Subscribe - Body you must at least pass in the listCallbackUrl() so that you know the endpoint of this specific Flow instance you need to call in your backend code. Note that listCallbackUrl() is generated automatically, is specific to this running instance of the Flow, and can only be called once. Flow processing will halt at this action and it will continue when your backend code calls the listCallbackUrl(). You can define timeout of how long the action waits for the callback in the action settings.

Here I’m also passing in the title of the SharePoint Library as I’m also doing some tricks on the library but you would pass in anything you need in your scenario.

BACKEND

In the backend code you will do whatever you need, but when you’re done, make HTTP POST call to the URL you received as a parameter in your backend code, in my case that would look like this in PowerShell.

 1
 2
 3
 4
 5
 6
 7
 8
 9
10
11
12
13
14
15
16
17
param(
    [Parameter (Mandatory = $true)]
    [object]$webhookData
)

# If runbook was called from Webhook, WebhookData will not be null.
if ($WebhookData) {
    # Retrieve VMs from Webhook request body
    $body = (ConvertFrom-Json -InputObject $WebhookData.RequestBody)

    ####
    # Do something in your code...
    ###
    
    # ...and when you're done, call the callback URL
    Invoke-WebRequest $body.CallbackUrl -Method POST -UseBasicParsing
}

If you look at the Flow when it is running, you see it pause at the HTTP Webhook action, and continue as soon as the backend calls the callback URL. You can also manually call the callback URL using e.g., Postman, just paste in the callback URL and make sure method is POST. You will get HTTP 200 when the callback call succeeds.


August 16, 2018

Azure functions: The remote runtime "~1" is not compatible with your local runtime "beta".

Problem

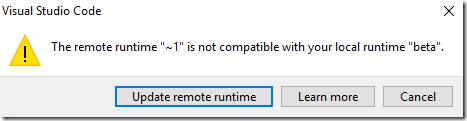
When trying to deploy Azure Functions from Visual Studio Code, you get error “The remote runtime "~1" is not compatible with your local runtime "beta".”

azfunc

As beta is not yet production ready, you may not want to update your Azure Functions in the portal to version 2, i.e., “beta”.

Solution

You probably created the Azure Function when you had version 2.0 of azure-functions-core-tools installed

npm i –g azure-functions-core-tools@core
when you should’ve installed the 1.0 version using
npm i -g azure-functions-core-tools

What you need to do is to go to VS Code workspace settings and change azureFunctions.projectRuntime from “beta” to “~1”. After that deployment works.

azfunc2

August 2, 2018

Cannot delete Azure Active Directory due to existing Enterprise Applications

Problem

After deleting all required objects from Azure AD, so you could delete it, the “Delete directory” validator still says “Delete all enterprise applications”, as there are custom Enterprise Applications preventing directory deletion.

1

Solution

Usually the reason is Microsoft Visual Studio Team Services Enterprise application. You can go to Properties, and flip “Enable for users to sign-in” to No, and it helps in some cases.

2

However, sometimes it is not enough, but you need to go and delete all Enterprise Applications via PowerShell (although many of them are internal Azure apps).

Command for logging in and deletion is:

Connect-AzureAD –TenantID <TENANT_ID>
#repeat the following line for EACH Enterprise Application, some will throw error, but ignore it
Remove-AzureADServicePrincipal –ObjectId <OBJECT_ID_OF_ENT_APP>

Then with your web browser, log out from the Azure portal, and log back in, and you should be able to delete the Azure AD using browser.

Do note that Get-AzureADServicePrincipal | Remove-AzureADServicePrincipal didn’t work for some reason, and I needed to do the removal one by one.

February 14, 2018

Azure B2C: Cannot delete directory due to ProxyIdentityExperienceFramework

Problem

I wanted to delete my testing Azure B2C directory, and followed steps to remove it at here and here. However, attempting to delete the directory, indicated that there was some app registrations preventing the deletion.

2

Clicking on the Required Action, I could see the Native ProxyIdentityExperienceFramework still existed. WHen I went ahead to delete it, I found out that the Delete button was disabled.

1

This app was created as part of configuring Azure B2C to use custom policies, as described here. App wasn’t a “converged app”, so it wasn’t visible in the Microsoft Application Console in order to delete it, as some suggested. I had also emptied the application of any Redirect URIs, Owners, Required permissions. Still the Delete button remained disabled.

Solution

  1. Go to Azure B2C tenant
  2. Click Azure Active Directory on left menu
  3. Click App registrations
  4. Select All apps from filter drop-down
  5. Select the ProxyIdentityExperienceFramework app
    3
  6. Select Manifest
  7. Change availableToOtherTenants to false
    4
  8. Click Save
  9. Click Delete to delete the app

November 13, 2017

Azure Stream Analytics job Query IoTHub.ConnectionDeviceId null

Problem

Having connected Azure Stream Analytics job to IoT Hub, and trying to get hold of IoTHub.ConnectionDeviceId in the Stream Analytics job Query, you just get NULL value. Several instructions on the net just say that query such as below should return the device id, but no.

SELECT IoTHub.ConnectionDeviceId AS DeviceId
INTO SQL
FROM IoTHub TIMESTAMP BY EntryTime

Posts such as this almost made me open a support ticket as I was suspecting some platform related issue.

Solution

This one was rather trivial once I used SELECT * to find out what is really coming from the IoTHub, so changing the query to

SELECT IoTHub.IoTHub.ConnectionDeviceId

will do the trick and you can get hold of the Device ID without explicitly passing it from the IoT device to IoT Hub.

And further searching got me to this article that has clear example with query such as in my example.

January 3, 2017

Azure VPN install hangs on Windows 10

Problem

Tried to install Azure VPN client (x64) on Windows 10, but after double-clicking on the installer, Windows Explorer always froze and I had to restart explorer.exe to wake it up again.


Solution

Smart Screen is failing due to some reason. When double clicking on the VPN client (AMD64).exe, you can see CHXSmartScreen.exe process being starter. Kill that process and VPN client installation starts normally.

smartscreen

April 22, 2016

How to configure SharePoint + SQL on Azure VM to use Internal Load Balancer

Task

While creating SharePoint 2016 MinRole farm in Azure with altogether 14 servers, it took me a while to understand how to configure SQL Server connection on SharePoint servers. In more simple farms without SQL Server AlwaysOn Availability Groups it was straightforward to simply set SQL Alias using cliconfg tool on each SharePoint server. However now that there would be Internal Azure Load Balancer (ILB) via which all traffic would flow from SharePoint servers to SQL Server, this SQL Alias wasn’t working.

Trying to point SQL Alias prodsql to the IP address of the ILB just didn’t work, but as soon as I pointed prodsql to one single SQL Server everything worked nicely.

Solution

As many times, the solution was simple, but for some reason I was just too stuck to the “always use SQL server alias” thought to realize, that this time I in fact needed to remove the SQL Alias from all SharePoint servers and instead create DNS A record that points from prodsql to the ILB IP address.

Case closed.

March 17, 2016

New-AzureRmResourceGroupDeployment : A parameter cannot be found that matches parameter name '_artifactsLocationSasToken'

Problem

I was trying to deploy new Azure Resource Group using private storage on Azure instead of GitHub (or some other publicly) hosted templates, but run into error when including artifacts.

With the default Deploy-AzureResourceGroup.ps1 (as it comes with Azure SDK, full file can be found, e.g., here), it throws the following error when UploadArtifacts parameter was set to $true.

New-AzureRmResourceGroupDeployment : A parameter cannot be found that
matches parameter name '_artifactsLocationSasToken'.

Same occurred if I execute Deploy-AzureResourceGroup.ps1 via PowerShell ISE or did Deploy via Visual Studio.

At the end of Deploy-AzureResourceGroup.ps1, there is call to Deploy-AzureResourceGroup.ps1 like this:

New-AzureRmResourceGroupDeployment -Name ((Get-ChildItem $TemplateFile).BaseName + '-' + 
((Get-Date).ToUniversalTime()).ToString('MMdd-HHmm')) ` -ResourceGroupName $ResourceGroupName ` -TemplateFile $TemplateFile ` -TemplateParameterFile $TemplateParametersFile ` @OptionalParameters ` -Force -Verbose

@OptionalParameters was correctly populated with HashTable containing values for _artifactsLocation and _artifactsLocationSasToken, but New-AzureRmResourceGroupDeployment is not accepting them.


Solution

Adding the missing parameters to azuredeploy.json solved the original error. What I didn’t know was that (obviously), New-AzureRmResourceGroupDeployment passes the parameters to the TemplateFile (usually called azuredeploy.json).

"_artifactsLocationSasToken": {
  "type": "string",
  "metadata": {
    "description": ""
  }
},
"_artifactsLocation": {
  "type": "string",
  "metadata": {
    "description": ""
  }
},

Solution 2

One final issue was that I needed to include the _artifactsLocation in the configuration variables of the resources like this to append the SAS Token to the URL so that deployment engine can fetch those from our private Azure Storage Account:

"provisioningPrimaryDCURL": "[concat(parameters('_artifactsLocation')
,'/provisioningPrimaryDomainController.json'
,parameters('_artifactsLocationSasToken')
)]",

December 15, 2011

Office 365 and Azure domain verification with Joker.com

CHALLENGE

I'm using joker.com domain registrar and Office 365 and Azure Active Directory (AD) needed to verify or validate that I'm the owner of the domain. This is done by either adding TXT or MX record to the DNS records at joker.com (domain registrar).

TXT is the preferred method in order to minimize risks of causing issues in mail delivery if one manages to type in incorrect values for the MX record.

THOUGHTS

In my (test) scenario I wanted to register intra.jussipalo.com.

Office 365 instructs the following:

  • In the TXT box for the domain, type the following: @
  • In the Fully qualified domain name (FQDN) or Points to box, type the following: MS=ms12312312
  • Where it asks for TTL information, type the following: 1 Hour

    Now, in Joker.com, I only have the fields Host and Description:

    image

    Host field didn't accept @.

    SOLUTION

    In Host field, type in the third level portion of the domain name, in my case intra, or if you’re registering full domain in Azure, type in [empty]. In Description, type in the MS=ms12312312.

    image

    Save and accept the changes and wait for some time (for me it took maybe 1-2 hours) and you can successfully verify the domain in O365 admin console.